Acclimation For AquaCorals Livestock
These instructions are meant for livestock purchased here for local take-home & for shipped livestock.
The beginning section is general fish & coral acclimation but below this are steps to acclimate & introduce items like starfish, clams, Sponges, Astrea snails etc.
The biggest killer is stress.
Stress results from being scared, from being collected bagged and transported to your home, from different parameters in their transport bag & the tank we're putting them into. We acclimate for differences in temperature, salinity & in some cases, PH. I DO NOT recommend drip acclimation for my animals because there should be very little difference to acclimate for & the longer these animals are acclimating, the longer they have to be stressed. Understand your fish are very scared so be sure to keep the room quiet & dimly lit. Move about & handle them gently so as not to scare them further. Remember, being scared = immune system lowers = more likely to have an Ick breakout.
All AquaCorals systems are maintained at an approximate salinity of 1.026. Always check the salinity of each bag & note any difference to your system salinity.
Be warned! Many stores keep their fish in a much lower Salinity making slower acclimation critical! If you find a difference of 2 degrees or more in any bag, double the below #6 & 7 steps.
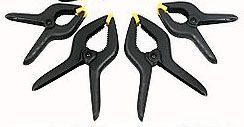
Tools to have on hand: Clean cup or turkey baster and optional Spring Clamps pictured below.
Normal Acclimation:
1. Turn off tank lights & have room dimly lit (for fish & inverts with eyes only - if corals, you can keep your lights on)
2. For Shippers - Start Here: Float fish bags unopened for 15 minutes then go to step 3.
3. For Local - Start Here: Open livestock bag at the top. My bags are closed with metal clips. Cut the bag just under the clip.
4. Empty approximately 1/2 of the water by pinching the bag top to keep the fish in and holding the bag bottom with your other hand, gently pour off some water into a sink or pail. Be sure to leave enough so the fish/coral etc. are comfortably covered in water!
5. Place bag in tank draping bag neck over tank rim. Make sure the bag cut is open to allow air into bag. I use plastic clamps (shown above) to secure the bag to the tank trim.
6. Gently add tank water to bag using your clean cup or turkey baster. Approximately 1/3 of the bags content.
7. Wait 15 minutes then repeat step 6
8. Wait another 15 minutes then release as follows:
For Fish - pinch the bag neck with one hand to keep the fish in while holding the bag bottom with your other hand & gently empty 90% of the water into a sink or pail then gently let the fish slide out of the bag & into your tank.
For Corals: Gently remove from bag & place in your tank.
For Astrea Snails:

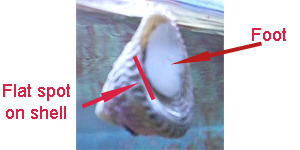
Astrea Snails need to be placed on their foot after acclimation or they can die. Note the bottom of their shell is round except for a small flat spot on the round where their foot comes out of the shell. You need to place that flat spot against the glass so that when they come out they can attach to the hard surface of your glass & motor on. Placing on your tank side & back walls are best so they're less likely to be in your way when you scrape your glass. If they fall for any reason you need to right them as described here.
You may turn on your actinic lights to observe 1/2 hour after all the fish have been placed in the tank. Run full lighting the next day.
Special Acclimation For Clams, Feather Dusters, Starfish & Sponges:
These animals have special needs where we never want to let them be exposed to air! Below is how to acclimate them. Caution! Never do this with another store's water unless you are positive they do not use chemicals etc. as their water can add contaminants to your tank!
DO NOT open the bag.
For Shippers - float the bag for 15 minutes then...
For Local & Shippers - Submerse the bag into your tank water & make a 2-3 inch cut in the bag being careful not to cut the animal.
Gently squeeze out any air left in the bag & let the bag sink/float with the hole under water. This allows your tank water to gently mingle with the bag water. My water is SAFE to be in your tank. I do not use medicines or chemicals unlike most other vendors.
After 1/2 hour reach in & while still under water stretch open the hole & release the animal under the water. Again, the point is to keep them from being exposed to air which can hurt & even kill them.

